First install the Apache HTTP server.
Use command: sudo apt-get install apache2
The /var/www/html folder is created when installing the apache HTTP server.
If you enter the following URL in a browser: http://raspberrypi you will see /var/www/html/index.html.
Furthermore, a whole series of PHP modules must be installed for nextcloud with command:
sudo apt-get install php7.3 l php7.3-common php7.3-gd php7.3-json php7.3-mysql php7.3-curl php7.3-mbstring php7.3-intl php7.3-mcrypt php-imagick php7.3-xml php7.3-zip
Also enable the apache2 Rewrite module: sudo a2enmod rewrite.
After this, the Apache HTTP server must be restarted: sudo service apache2 restart
Check https://download.nextcloud.com/server/releases/ to determine the most recent version of Nextcloud.
Navigate in a terminal on the Raspberry pi to the relevant folder:
cd /var/www/html
Run the following command:
curl https://download.nextcloud.com/server/releases/nextcloud-.tar.bz2 | sudo tar -jxv -k
This installs Nextcloud.
Run the following commands:
- sudo mkdir -p /mnt/raiddrive/nextcloud/data
- sudo chown www-data: www-data /mnt/raiddrive/nextcloud/data
- sudo chmod 750 /mnt/raiddrive/nextcloud/data
- sudo chown -R www-data: www-data nextcloud/config nextcloud/apps
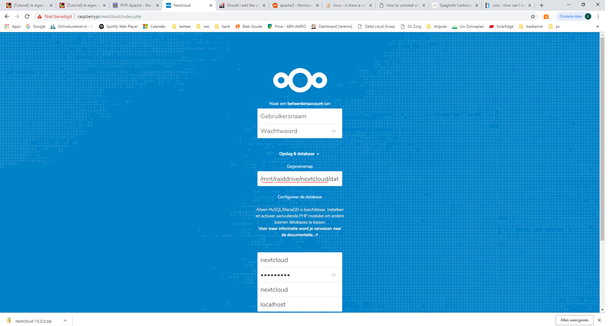
Now start Nextcloud by opening in the browser: http://rapsberrypi/nextcloud
This opens the screen for the initial setup.
- Change the data folder to: / mnt/raiddrive/nextcloud/data
- Modify the data for the MariaDB database in accordance with what was created when setting up MariaDB; leave the host on localhost.
Confirm the entered data and Nextcloud is initiated. That takes a while ….
If Nextccloud is successfully started, it can only be accessed from the http-host raspberrypi from your local network. That will be enhanced later on.
Previous pageNext page